Seagate ST3300007LW Uživatelská příručka
Procházejte online nebo si stáhněte Uživatelská příručka pro Softwarové licence / aktualizace Seagate ST3300007LW. Seagate ST3300007LW User`s guide Uživatelská příručka
- Strana / 89
- Tabulka s obsahem
- ŘEŠENÍ PROBLÉMŮ
- KNIHY
- SCSI Hammer™ 1
- Your Data Is Most Important! 2
- Disclaimer and Notice 3
- Trademark Disclaimer 3
- Table of Contents 4
- Page 5 of 89 5
- Company Information 6
- Limited Warranty Statement 7
- Introduction 8
- SCSI Hammer™ Quick Start 9
- Getting Started 10
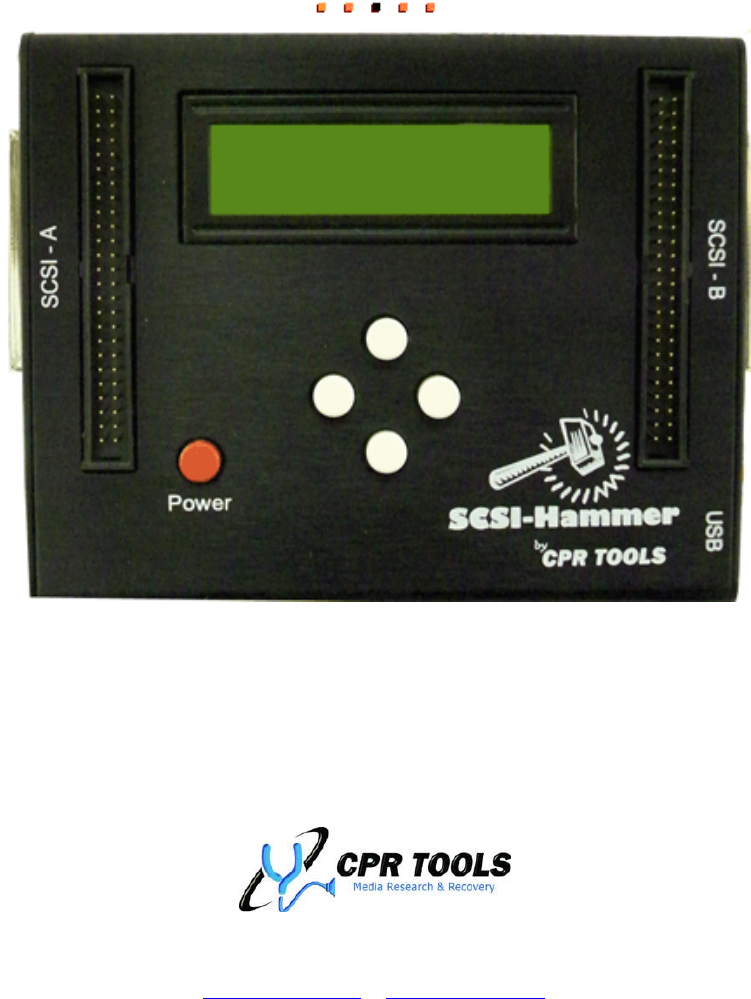
- Overview 11
- Overview (continued) 12
- SCSI Hammer™ User Interface 13
- SCSI Hammer™ Users Guide 16
- Page 16 of 89 16
- SCSI Hammer™ Letter Codes 17
- SCSI Hammer™ Functions 19
- 0x00) to every sector 20
- Operations 21
- Scan For Devices 24
- Identify Drive 25
- Clear Logs 27
- Settings 28
- Restore Defaults 33
- Default: Not applicable 33
- Page 34 of 89 34
- Page 35 of 89 35
- Software: 36
- CPR Tools Utilities Suite 36
- Page 38 of 89 38
- Page 39 of 89 39
- Page 40 of 89 40
- Page 41 of 89 41
- Figure 17 - Ready To Install 42
- Page 42 of 89 42
- Page 43 of 89 43
- Page 44 of 89 44
- Page 45 of 89 45
- Page 46 of 89 46
- Page 47 of 89 47
- Launching CPR Toolbox™ 48
- Page 49 of 89 49
- Page 50 of 89 50
- Page 53 of 89 53
- Page 54 of 89 54
- Control Panel 55
- CPR Toolbox™ Control Panel 56
- The “EZ Hammer” Tab 56
- Page 57 of 89 57
- The “Hammer” Tab 58
- Page 59 of 89 59
- Page 60 of 89 60
- Page 61 of 89 61
- Page 62 of 89 62
- Page 63 of 89 63
- The “Verify” Tab 64
- The Settings Tab 65
- Drive Info 66
- Drive Utilities 66
- Recover 67
- Security 67
- Reporting 68
- Selecting a Device 69
- Page 70 of 89 70
- Page 71 of 89 71
- Page 72 of 89 72
- Page 73 of 89 73
- Page 74 of 89 74
- Figure 41 - A Job Report 74
- Page 75 of 89 75
- Figure 43 - Cert Tab 76
- Page 76 of 89 76
- Certificate of Compliance 77
- Page 78 of 89 78
- Figure 45 - Print Labels tab 79
- Page 79 of 89 79
- Page 80 of 89 80
- Figure 46 - Log Tab 81
- Page 81 of 89 81
- Page 82 of 89 82
- Page 83 of 89 83
- Page 85 of 89 85
- FAQ / Troubleshooting 87
- Product Specifications 88
- Customer Support 89
Shrnutí obsahu
“Helping You Find What You’re Looking For” 905 Industrial Blvd • LaBelle, FL 33935 www.cprtools.net • [email protected] SCSI Hammer™ User’
SCSI Hammer™ Users Guide Page 10 of 89 Getting Started Before starting to use your new SCSI Hammer™, take a moment to examine the contents of y
Overview One of the design strengths of SCSI Hammer™ is the ability for the device to erase multiple hard drives simultaneously – as many as thirty (
Overview (continued) Audit Trail Keeping strict records of the eradication of data is required by most specifications. For this reason, SCSI Hammer™
SCSI Hammer™ User Interface The SCSI Hammer™ menu structure begins with seven (7) top level menu items. Each of these will be described in detail.
|======================== |START |======================== |OPERATIONS |--------ERASE DRIVE |--------|-----BANG* |--------|-----SECURE ERASE |-----
Examplle: Power OThe follovalue. Tmay be uWhere <SnavigatioOnce a mmenu optraversaWhen inthexadecExampleTo changelevel menpressing tTimeout’ P
SCSI Hammer™ Power-On Example When initially powered, SCSI Hammer™ will display CPR Tools / SCSI Hammer™ and the version number. SCSI Hammer™ will t
Using SCSI Hammer™ - Understanding the LCD During an operation, SCSI Hammer™ will provide up-to-date information on task progress using the 2 line by
An underscore character (_) indicates no drives found in that bus position. An asterisk (*) indicates a device has been found. The block character
SCSI Hammer™ Users Guide Page 19 of 89 SCSI Hammer™ Functions The menu structure described in Figure 6 is meant to serve as a handy reference.
Your Data Is Most Important! Your data and the security of your data are paramount. CPR Tools recognizes this and has developed a unique and bold met
Using the default values, SCSI Hammer™ will erase all data on all attached drives by writing zeros (0x00) to every sector. Begin the erasure process
Operations Menu Tree The Operations menu tree defines how SCSI Hammer™ will act when used in stand-alone mode. The five (5) operations listed will e
|========|OPERATIO================== |--------ONS |---------ERASE DRIVE |---------|-----BANG* |---------|-----SECURE|---------|-----3 PASSE ERASE |--
|======================== SCSI Hammer Tips: To ensure complete data eradication, the ‘Set Native Max’ setting should always be ‘Enabled’. |OPERATIONS
Scan For Devices Menu Tree |======================== |SCAN FOR DEVICES |--------A SIDE |--------B SIDE |======================== Default: N/A SCSI
Identify Drive Menu Tree |======================== |IDENTIFY DRIVE |--------A SIDE |--------|-----DRIVE <ID> |--------B SIDE |--------|-----DRI
Once thepress thethe drivedisplays Upon sucSCSI Hasignifican1. V2. P3. P4. CUse the scroll thr Print LaMenu Tre|========|PRINT LA|--------|-------
SCSI Hammer™ Users Guide Page 27 of 89 Verify Menu Tree |======================== |VERIFY |======================== Defaults: N/A The ‘Veri
SCSI Hammer™ Users Guide Page 28 of 89 Settings Menu Tree The user may set options that will customize certain SCSI Hammer™ functions. User
|======================== |SETTINGS |--------POWER ON TIMEOUT |--------|-----POWER ON TIMEOUT |--------|-----|--<SELECT TIME IN MS> |--------CO
SCSI Hammer™ Users Guide Page 3 of 89 Disclaimer and Notice SCSI Hammer™ is a data eradication tool. The primary purpose of this device is to
|======================== |SETTINGS |--------POWER ON TIMEOUT |--------|-----POWER ON TIMEOUT |--------|-----|--<SELECT TIME IN MS> |--------C
The following list contains connection failure messages and their meanings: SCSI Hammer™ was unable to ‘find’ the printer Printer found; SCSI Hamme
|======================== |SETTINGS |--------POWER ON TIMEOUT |--------|-----POWER ON TIMEOUT |--------|-----|--<SELECT TIME IN MS> |--------CO
SCSI Hammer™ Users Guide Page 33 of 89 |======================== |SETTINGS |--------POWER ON TIMEOUT |--------|-----POWER ON TIMEOUT |-------
SCSI Bus Termination with SCSI Hammer™ Working with SCSI devices requires the use of SCSI bus termination to ensure the integrity of data signals bei
SCSI Hammer™ Users Guide Page 35 of 89 SCSI Bus Termination with SCSI Hammer™ (continued) 2. When connecting SCSI Hammer™ to a SCSI hard driv
Software: CPR Tools Utilities Suite The CPR Tools Utilities Suite is a collection of software designed to work with Hammer™, PSIClone™, SCSI Hammer™
Working with a Windows XP®, Windows Vista® or Windows 7® Host The CPR Utilities Suite is a collection of applications designed to run on Microsoft®
The ‘License Agreement’ screen which follows, is shown in Figure 12. Figure 12 - License Agreement The destination of the installation is user confi
By default, the program will install to the system drive (typically ‘C:’) under ‘Program Files\CPR Tools\CPR Tools Utilities Suite\’. To install to
SCSI Hammer™ Users Guide Page 4 of 89 Table of Contents Your Data Is Most Important! ...
The ‘Select Start Menu Folder’ dialog is presented. The default entry will cause a folder named ‘CPR Tools’ to appear under ‘Start/Programs’. Within
The ‘Select Additional Tasks’ dialog is presented which offers users the ability to create Desktop and Quick Launch shortcuts for selected components
The ‘Ready to Install’ dialog box is presented to confirm all selected components. To change which components are to be installed, click ‘Back’.
The default settings for the installer may cause the ‘Windows Logo Testing’ dialog box to appear. Figure 19 - Windows Logo Testing dialog box. Click
When the installer has completed, a confirmation message is displayed. Figure 20 - Installation Complete To exit the installer, click ‘Finish’. If
Connecting SCSI Hammer™ to a Host Computer (USB 2.0 required) Using SCSI Hammer™ with a host PC requires a USB 2.0 connection. When the CPR Tools Ut
Select the radio button labeled ‘Install the software automatically (Recommended). Click ‘Next’. SCSI Hammer™ Users
An alert dialog, shown here, may appear. To continue with driver installation, click ‘Continue Anyway’. When the PSIClone™ driver ha
Launching CPR Toolbox™ If CPR Toolbox™ was installed using default installer settings, the program may be launched from the Windows Start menu, under
The ‘File’ menu: Clicking the ‘File’ menu reveals options displayed above. ‘Save Log’, ‘Print Log’, ‘Find in Log’, ‘Close’ and ‘Exit’ are presented
SCSI Hammer™ Users Guide Page 5 of 89 Security ...
The ‘Edit’ Menu: The first option under the ‘Edit’ menu is ‘Preferences’. Selecting ‘Preferences’ will instruct CPR Toolbox™ to present the Prefere
The Preferences box is divided into two (2) sections labeled General and Power Settings. General This section contains options which define how CPR T
The ‘View’ Menu: The ‘View’ menu provides the ability to select or deselect areas of the CPR Toolbox™ from being displayed. Expanding the item lab
The ‘Help’ Menu: Online help is available from within this menu by clicking ‘Help’. The remaining options and their functions are: PSIClone™ / Hamm
The CPR Toolbox™ Standard Toolbar The CPR Toolbox™ software is easily controlled through the convenient button bar at the top of the main Toolbox win
SCSI Hammer™ Users Guide Page 55 of 89 Rescan Clicking this toolbar button will cause the CPR Toolbox™ to rescan for CPR Tools devices (e.g.
Figure 28 depicts the initial view after pressing the ‘Control Panel’ button. The ‘EZ Hammer’ tab is displayed. CPR Toolbox™ Control Panel The “EZ H
eradication of data and sound an audible tone to alert the user that the process has completed. A Sample EZ Cert is presented here. Customizing EZ-C
The “Hammer” Tab Figure 29 - The 'Hammer' Tab - CPR Toolbox The Hammer tab provides options for specific SCSI Hammer™ actions. The top
SCSI Hammer™ Users Guide Page 59 of 89 Figure 30 - Drives attached to SCSI Hammer Figure 30 depicts the top portion of the Control Panel’s Ha
Company Information CPR Tools, Inc. 905 Industrial Blvd. LaBelle, FL 33935 Tel: 863-674-0120 Fax: 863-674-0066 Email: [email protected] Web: www.cprt
SCSI Hammer™ Users Guide Page 60 of 89 There are four (4) choices available from the initial drop down box within the Operations section of the
The Progress section of the Hammer tab provides a visual representation of the status of an eradication process. Figure 32 - Hammer Tab - Progress
Details about the drives at those locations are shown in the ‘Destination Drive(s)’ box, as depicted in Figure 33. Figure 33 - Hammer tab - Destinat
SCSI Hammer™ Users Guide Page 63 of 89 During an erasure process, the Hammer tab provides individual drives status as well as overall progress
The “Verify” Tab SCSI Hammer™ Users Guide Page 64 of 89 Figure 35 - Verify Tab The Verify tab, depicted in Figure 35, allows for verification
The Settings Tab Figure 36 - The Settings Tab The ‘Settings’ tab provides the ability to change default settings for SCSI Hammer™ actions. Changes
SCSI Hammer™ Users Guide Page 66 of 89 Drive Info Clicking the Drive Info toolbar button will reveal two (2) options: As both of these comman
Recover Clicking the Recover toolbar button will reveal six (6) submenu items. This toolbar button is primarily for use with CPR Tools’ PSIClone™ d
SCSI Hammer™ Users Guide Page 68 of 89 Reporting Clicking the Reporting toolbar button will cause CPR Toolbox to open the Reporting module. Th
Selecting a Device At the top of the reporting module, users will find a drop-down menu which allows for: • The selection of an attached device • T
SCSI Hammer™ Users Guide Page 7 of 89 Limited Warranty Statement CPR Tools, Inc. products are warranted by CPR Tools, Inc. against manufacturin
The “Jobs” Tab – CPR Toolbox™ Reporting The ‘Jobs’ tab allows users to organize actions performed into groups of actions, called ‘Jobs’. While som
SCSI Hammer™ Users Guide Page 71 of 89 If Hammer™ has activities stored in Flash Memory, clicking the Download Tasks button will cause Hammer™
To view downloaded tasks, select the appropriate ‘Task Source’ from the drop down menu. All existing ‘Jobs’ are listed in this drop-down list. Unas
Users may assign tasks to an existing job by using the drop-down list provided. First, select the tasks to be assigned, then select the appropriate
To create a Job, simply type the new job name in the text box labeled ‘Enter Job Name’, then click the button labeled ‘Create’. Hammer™ Tip
Hammer™ Tips: Saved Jobs may be selected on the Cert Tab to produce a series of Certificates of Compliance after the fact. This is an important audi
The “Certificates” Tab – CPR Toolbox™ Reporting Figure 43 - Cert Tab The ‘Cert’ tab provides an interface through which a ‘Certificate of Complian
Clicking ‘Generate’ will produce a ‘Save As’ dialog, prompting for a save location for the certificate. The default location is C:\Documents and Set
SCSI Hammer™ Users Guide Page 78 of 89 SEAGATE ST3300007LW B_00 CLEAR PASS N/A N/A SEAGATE ST3300007LW B_00 CLEAR PASS N/A N/A SE
The “Print Labels” Tab – CPR Toolbox™ Reporting (Requires: Optional Bluetooth Printer) Figure 45 - Print Labels tab SCSI Hammer™ Users Guide
Introduction Congratulations on your purchase of SCSI Hammer™ from CPR Tools. This quality product was developed by CPR Tools’ engineers in answer
If the optional Bluetooth printer is present, this tab may be used to generate labels for drives erased with SCSI Hammer™. The Print Labels tab allo
The “Device Log” Tab – CPR Toolbox™ Reporting Figure 46 - Log Tab The ‘Log’ tab displays a log of the most recent action Hammer™ has completed. In
The “Alert Settings” Tab – CPR Toolbox™ Reporting Figure 47 - Alert Settings Tab The Alert Settings tab provides a method for email alerts to be iss
To instruct CPR Toolbox™ to send alert emails, check the box labeled ‘Enable Email Alerts’ and provide information in the fields named: • Sender o
Figure 50 shows the Email Configuration section filled out with sample data. Figure 50 - Email Configuration, sample data shown SCSI Hammer™ U
Successful sending of the test email should result in the destination/recipient address’ receipt of an email similar to the one depicted here: Email
Alert Settings for Devices not currently connected To begin configuring custom alert settings for a CPR Tools device not currently connected to the h
SCSI Hammer™ Users Guide Page 87 of 89 FAQ / Troubleshooting 1. After starting SCSI Hammer™, LCD does not light, device is unresponsive. En
Product Specifications CHARACTERISTIC SPECIFICATION Drive Interfaces: 50 pin and 68 pin SCSI interfaces, Single ended and differential Host Interfa
SCSI Hammer™ Users Guide Page 89 of 89 Customer Support For more information, please visit us on the World Wide Web at http://www.cprtools.net/
SCSI Hammer™ Quick Start SCSI Hammer™ Users Guide Page 9 of 89 Out of the box, your SCSI Hammer™ is ready to start erasing drives. To quickly
Související produkty a manuály pro Softwarové licence / aktualizace Seagate ST3300007LW
 (54 stránky)
© 2020, manymanuals.cz. Všechna práva vyhrazena. | 0.085 s |
 Manymanuals.com
 Manymanuals.de
 Manymanuals.fr
 Manymanuals.it
 Manymanuals.pl
 Manymanuals.cz
 Manymanuals.es
 Manymanuals-pt.com
Komentáře k této Příručce